WW2 AERIAL RECON STUDIES
Battle of the Bulge Part 1: German Attack, 24 December 1944
Western Front
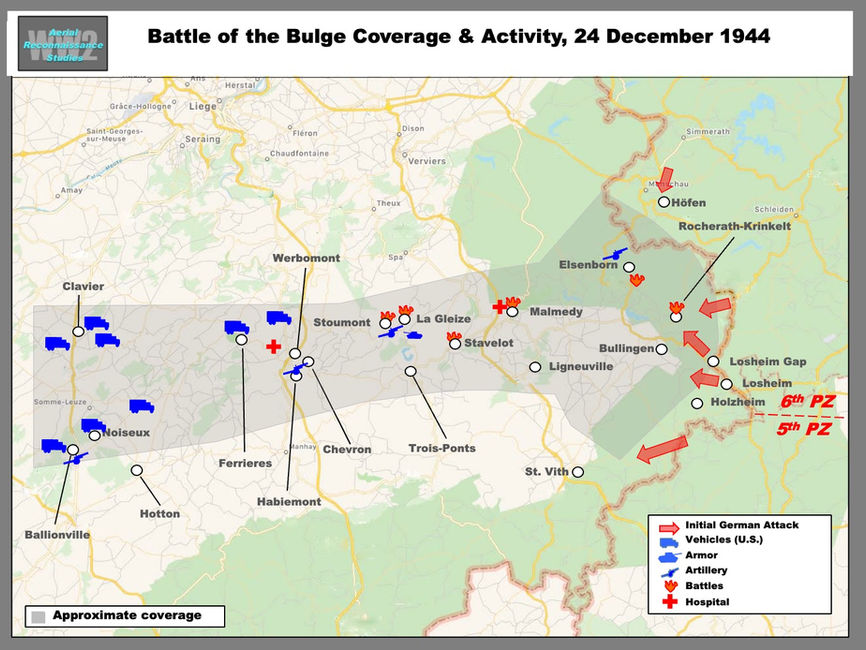
Clearing skies over the Ardennes on 24 December 1944 permitted USAAF reconnaissance over the area that was penetrated by Kampfgruppe Peiper at the start of the Battle of the Bulge on 16 December. Nearly the entire north flank of the Battle of the Bulge was imaged, revealing action at Stoumont and La Gelize, where the kampfgruppe had been trapped by elements of the U.S. 30th Infantry Division, 3rd Armor Division and 82nd Airborne Divisions (Map 1). Other battle sites --Rocherath-Krinkelt ('the Twin Villages'), Elsenborn, Malmedy and Stavelot-- were also imaged, as was widespread evidence of artillery bombardment, vehicular movements and deployments.
Kampfgruppe Peiper, the spearhead of the 1st SS Panzer Division, 6th Panzer Army, was assigned to the north flank of the Ardennes operation. The formation, commanded by Col. Joachim Peiper, was to drive at maximum speed to the Meuse River crossings at Huy. Kampfgruppe Peiper was to be closely followed by the remainder of the 1st SS Panzer Division, the 12th Panzer Division and the 3rd Parachute Division. Peiper's planned route on 16 December (the 6th Panzer was allotted five march routes) extended from Losheim through Schoppen, Ligeneuville, Stavelot and Werbomont (Map 2), but unrepaired rail overpasses in the Losheim Gap forced a costly detour west through Lanzerath and past Bucholz (rail) station.
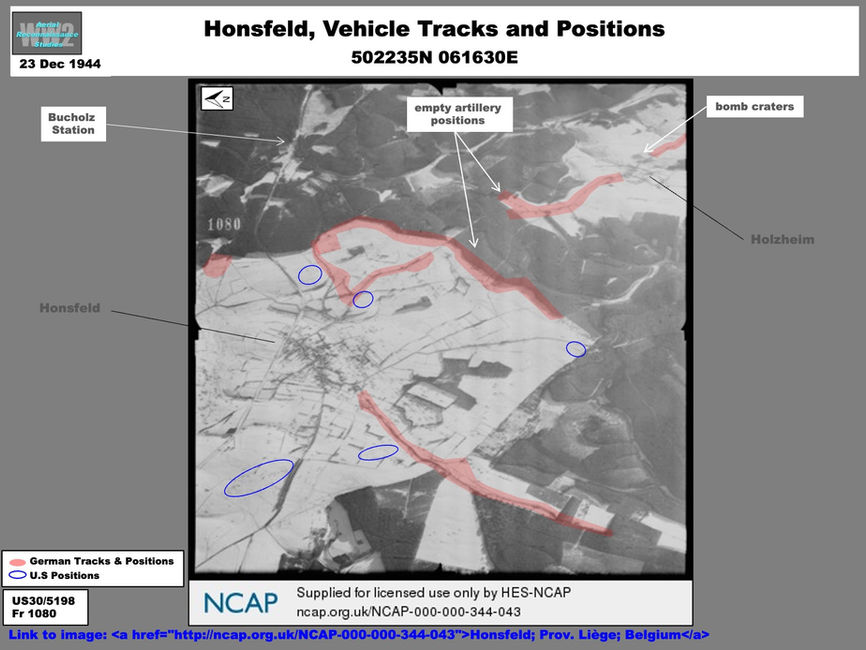
Emerging from the forest outside Honsfeld early on 17 December, the kampfgruppe met little resistance. The 24 December imagery of Honfeld shows empty positions and tracks left by German forces. Heavy trackage along the road west-southwest of Honsfeld likely was made by elements of the 5th Panzer Army operating in the center of the offensive (Graphic & Map).
Evidence of the passage of probable 5th Panzer Army elements to St. Vith could be seen southwest of Honsfeld (Graphic 1 & Map 3). Another route appeared to head northwest through the village of Wereth, where 11 U.S. soldiers were massacred on 17 December (Map). Both tracks appeared to head toward the village of Amel (Amblève), where artillery impacts and several areas of fresh bomb craters could be seen (Map). Compared to other contested towns, the vacant American defenses around Amel were fairly extensive. Three kilometers to the west, a probable (vacant) U.S. deployment site with armor vehicle tracks was at the east edge of a forest near the town of Montenau. Seven vehicles were on the road east of Amel.
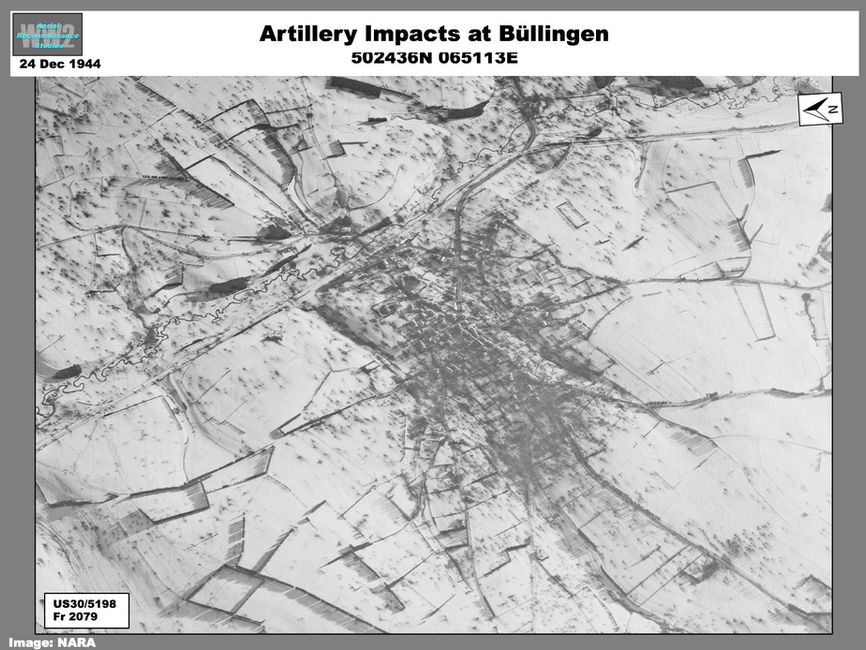
From Honsfeld Peiper turned north, opting to take a paved road north to Büllingen; here he was able capture American stores of fuel, but also came under artillery fire. On 24 December, Büllingen --like other key towns-- showed the effect of sustained artillery bombardment (Graphic & Map). It is unclear which road or roads the kampfgruppe took next, but by noon on the 17th it had reached Ligeneuville; on the way, elements had committed the Malmedy Massacre at the village of Baugnez (Graphic).
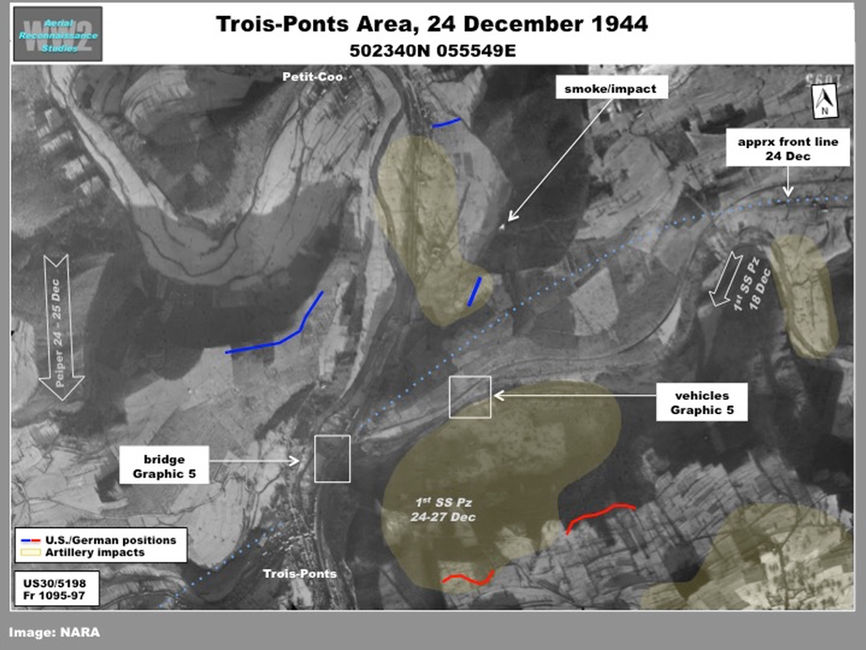
Lead elements of Kampfgruppe Peiper reached the crossing at Amblève Stavelot on the evening of 17 December (Maps). Peiper delayed a crossing until the next morning, but by that time elements of the U.S. 119th Inf Regiment (30th Inf Div) had arrived at the town. After stiff resistance the Americans were forced to withdraw from the town without blowing the bridge. While still attempting to take Stavelot, Peiper sent a detachment south of the river to another Amblève crossing point at Trois ponts, 5 km to the southwest (Graphic). The detachment was stopped by a U.S. engineer company guarding the town. Employing a single commandeered anti-tank gun at a roadblock, the company was able to destroy some enemy tanks, blocking the road; it then blew bridges over the Amblève and Salm rivers (Graphic).
Unable to force a crossing at Trois Ponts, Kampfgruppe Pieper continued north in the direction of La Gleize and Stuomont, where it was finally stopped (see Maps 2 & 4 and article Battle of the Bulge: Kampfgruppe Peiper at Stoumont and La Gleize). On Christmas Eve, survivors of Kampfgruppe Peiper would escape on foot west of Trois Ponts to rejoin the 1st SS Panzer Division southwest of Stavelot.
By 20 December the rest of the 1st SS Panzer Division assembled southwest of Stavelot in a bid to break through to Kampfgruppe Peiper at Stoumont (Maps 1 & 4). After several attempts to cross the rivers around Trois Ponts, the division was able to establish a small presence on the north bank of the Amblève between Ster and Parfond Ruy (Graphic). A burning building at Parfond Ruy on 24 December was likely related to fighting in this area.
After meeting American resitance at Stavelot on 18 December, the main body of Kampfgruppe Peiper once again headed to Trois Ponts along the north bank of the river. A detachment was left to hold the town until the expected arrival of the 3rd Parachute Div; however, on 19 December American forces counterattacked and retook Stavelot. This time, they were able to blow the bridge, effectively cutting off Peiper from resupply (Graphic). The 24 December imagery revealed the north section of bridge had been destroyed. Also visible were American defensive positons north of the bridge and an immobilized tank,'Tiger 222', just to the south. At least 20 probable U.S. vehicles could be seen elsewhere in Stavelot.
While Peiper headed west, other elements of the 6th Panzer Army --including the 12th SS Panzer Division, 12th Volksgrenadier Division (VGD), 277th VGD and 3rd Parachute Division-- attacked the Elsenborn area where U.S. infantry (elements of the 99th Inf Div) and artillery was concentrated (Map 3). The attack focused on the villages of Rocherath and Krinkelt and later Bütgenbach at the base of the Elsenborn Ridge (Bütgenbach was not imaged). Lasting between 16 and 26 December, the 'Battle of the Twin Villages' held up the German offensive on Kampfgruppe Peiper's north flank. Except for evidence of heavy bombardment, there was no evidence of ongoing fighting at the villages on 24 December; however, infantry positions and evidence of earlier German passage from the forest could be seen (Graphic 8). More than 10 American artillery batteries --most probably occupied-- were deployed on the Elsenborn ridge in the vicinity of a barracks, Camp Elsenborn (Map & Graphic).
The town of Malmedy, a major town on the Amblève, was bypassed by Kamfpgruppe Peiper on 17 December. Originally an objective of the 12th SS Panzer Division (still engaged at the twin villages), Malmedy was finally attacked by the 150th Panzer Brigade (Skorzeny) on the 21st and 22nd. By that time, however the town's defenses had been reinforced and the 150th was forced to move on (Graphic). On 24 December, the only activity observed at Malmedy were burning buildings in the town square, the results of an errant USAAF bombing attack. At least two areas of vehicle trackage could be seen north of Malmedy, along with two empty artillery sites. A hospital staffed by the 44th and 67th Evacuation Hospitals was located in the western part of the town.
American Rear Area
The area around Werbomont, one of Kampfgruppe Peiper's primary objectives, was also a major American logistical area. The area was also only 4 km west of the Lienne Creek where the kampfgruppe made an approach on 18 December (Map 5, Graphic). On 18 December, the 82nd Abn Div assembled at Werbomont to shore up defenses southwest of Stoumont where elements of the 30th Inf Div and 3rd Armor Div were engaged with the Kampfgruppe. On 24 December numerous U.S. vehicles could be seen on roads and in deployment sites, and at least three artillery batteries were deployed between Werbomont and Habiémont. Vehicles and tents were observed in two areas vehicles was near one battery (Graphic). A possible command post, indicated by the presence of several vehicles, was located at a small chateau 2.5 km east of Werbomont. In other activity, a major American field hospital was deployed along a road about 2.5 km northwest of Werbomont near the town of Grand Trixhe (Map 5, Graphic 13). The hospital was composed of three sections and was very active, with more than 40 vehicles in the vicinity. Subsequent imagery from 25 December showed that the entire hospital had been moved.
Further west, numerous trucks could be seen on roads and in deployment areas between Clavier and Baillonville (Map ). An artillery battalion deployed south of Baillonville was probably covering American defenses around Hotton which were threatened by elements of the 5th Panzer Army.


